# 搭建一个脚手架工具
本文讲述如何搭建一个简易的脚手架工具。
简单概括脚手架的原理,即,建好一个模板项目(例如一个已经做好常用配置的vue/react项目),而最简单的脚手架功能就是把这个项目clone下来。
本文示例的项目参见dc-cli (opens new window),前身为crx-cli (opens new window), 示例版本增加了react模板,并不再使用
child_process.exec直接执行git clone命令,而是引入了download-git-repo依赖。示例版本因为个人网络原因未能发布,后续将更改包名为
@dc/cli发布, 详见组织项目dc-cli (opens new window),目前已引入vue-cli以及create-react-app的功能。
# 开始搭建
- 目录结构

- 执行
npm init命令生产package.json文件,并下载依赖

- 编写执行文件/bin/dc-cli.js
#!/usr/bin/env node
node执行文件首行需注明#!/usr/bin/env node显式的声明这个文件用node来执行
'use strict'
const program = require('commander');
const init = require('../command/init');
引入commander (opens new window),引入脚手架主体方法文件
program
    .version(require('../package').version, '-v, --version')
    .usage('<command> <type> <projectName>')
    .command('init <type> <projectName>')
    .description('download a new initial project, type could be "vue" or "react"')
    .alias('i')
    .action((type, projectName) => {
        init(type, projectName)
    })

program.parse(process.argv)

if(!program.args.length){
    program.help()
}
if(!program.args.length){ program.help() }如果只是输入"dc-cli"没带参数,就展示能输入的所有命令
.usage('<command> <type> <projectName>')修改帮助信息的首行提示
.description('download a new initial project, type could be "vue" or "react"')命令的描述

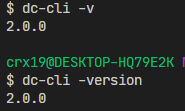
.version(require('../package').version, '-v, --version')设置版本号查询命令,
当命令参数为-v/-version,响应package.json文件配置的version

.command('init <type> <projectName>') 配置命令,命令是init,必要参数为type、projectName
.alias('i')命令别名
.action接收一个函数,入参即为命令参数,我们将在这里调用脚手架工具的主体方法
program.parse(process.argv)必须,解析命令行参数argv
- 编写脚手架功能/command/init.js
'use strict'
const chalk = require('chalk');
const ora = require('ora');
const download = require('download-git-repo');

const vue_projectUrl = 'Jiuto/dc-vue';
const react_projectUrl = 'Jiuto/dc-react';
chalk:终端字符串美化工具
ora:loading样式
download-git-repo:项目拉取工具
声明两个变量,为两种模板项目的git地址,作为download-git-repo的参数
拉取项目的逻辑十分简单,直接看代码
module.exports = function(type, projectNmae) {
    // 开始计时
    let initStart=new Date().getTime();
    // 判断type入参,设置需要拉取的项目url
    let url = type === 'vue' ? vue_projectUrl : type === 'react' ? react_projectUrl : '';
    // 当type非法时,给出红色提示
    if(!url) {
        console.log(chalk.redBright("type must be vue or react"));
        return
    }
    // 提示开始初始化模板
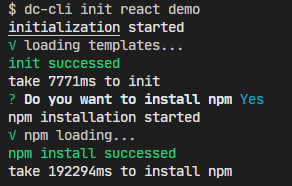
    console.log(chalk.whiteBright('initialization started'));
    // 设置loading
    let loading = ora('loading templates...');
    loading.start();
    // 拉取模板,传入项目地址、项目名称、以及回调函数
    download(url, projectNmae, (error) => {
        // 出现错误,则停止loading,打印错误提示
        if (error) {
            loading.stop();
            console.log(error);
            console.log(chalk.redBright("failed to init"));
        }
        // 拉取成功,则停止loading,打印成功提示和耗时
        else{
            loading.succeed();
            console.log(chalk.greenBright("init successed"));
            let initEnd=new Date().getTime();
            console.log(chalk.whiteBright('take '+(initEnd-initStart)+'ms to init'));
        }
    })
}


- 增加安装依赖功能
const exec = require('child_process').exec;
const inquirer = require('inquirer');
const promptList = [
    {
      type: 'confirm',
      message: 'Do you want to install npm',
      name: 'watch'
    }
];
exec:node自带衍生shell执行命令的方法
inquirer:命令行交互工具
promptList:交互的内容(type:交互提问类型,message:交互文字,name:用户输入的回答变量)
inquirer.prompt(promptList).then(answers => {
    if(answers.watch) installNPM(projectNmae)
})
在项目拉取成功代码下方加入上述代码,当回答的watch变量判断为真,则调用安装npm方法并传入项目名
安装npm的逻辑仍然直接看代码
// 安装依赖
function installNPM(projectNmae){
    // 进入项目目录
    process.chdir(process.cwd()+'/'+projectNmae);
    // 开始计时
    let installStart=new Date().getTime();
    // 打印安装开始提示
    console.log(chalk.whiteBright('npm installation started'));
    // 设置loading
    let loading = ora('npm loading...');
    loading.start();
    // 执行`npm install`命令
    exec(`npm install`, (error) => {
        // 出现错误,则停止loading,打印错误提示
        if(error){
            loading.stop();
            console.log(error);
            console.log(chalk.redBright("failed to install npm"));
        }
        // 安装完成,则停止loading,打印成功提示和耗时
        else{
            loading.succeed();
            console.log(chalk.greenBright("npm install successed"));
            let installEnd=new Date().getTime();
            console.log(chalk.whiteBright('take '+(installEnd-installStart)+'ms to install npm'));
        }
        // 退出shell命令
        process.exit()
    })
}
