# webpack多页面打包方法工具和模板
本文介绍一个多页面打包方法工具的封装和使用,项目代码见webpack_template (opens new window)
# 打包前后目录结构效果
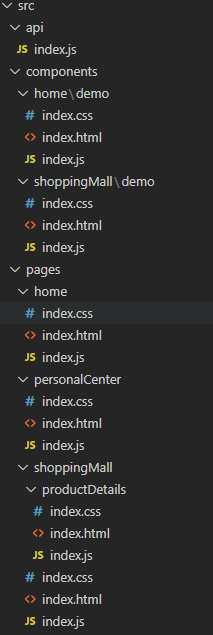
- 打包目标为src目录,src目录下又分两类:
第一类如api这类文件夹,属于直接复制即可,此外还有一些静态资源如images等;
第二类是pages,即业务文件夹,下分为对应的personalCenter、shoppingMall等二级目录,即个人中心模块/商城模块,每个模块目录下的index文件即该模块主页,子目录如productDetails文件即商品模块子页面的商品详情;
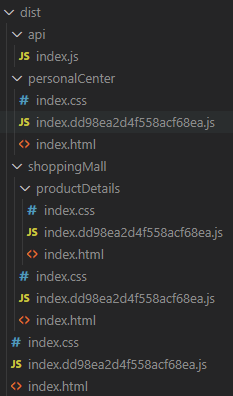
- 打包后的文件输入在dist文件夹下:
第一类文件直接复制到dist文件,第二类文件仅保留模块目录结构(不再有src/pages层),如,
dist/api/service.js
dist/shoppingMall/index.html
dist/shoppingMall/productDetails/index.html
# 方法工具的使用模板
# 组件写法
商品组件html:src/components/shoppingMall/demo/index.html
<div class="demo">
    this is shoppingMall components demo
</div>
商城组件css:src/components/shoppingMall/demo/index.css
.demo {
    color: green;
}
# 页面引入
商品详情页html:src/pages/shoppingMall/productDetails/index.html
<!DOCTYPE html>
<html lang="en">
<head>
    <meta charset="UTF-8">
    <meta name="viewport" content="width=device-width, initial-scale=1.0">
    <title>Document</title>
</head>
<body>
    <%= require('raw-loader!components/shoppingMall/demo/index.html') %>
</body>
</html>
商城详情页css:src/pages/shoppingMall/productDetails/index.css
@import "~components/shoppingMall/demo/index.css";
body {
    background-color: gold;
}
商城详情页js:src/pages/shoppingMall/productDetails/index.js
import './index.css'
# webpack配置
引入webpack-utils,example示例中即const utils = require('../index.js');
const HtmlWebpackPlugin = require("html-webpack-plugin");
// 给setEntryAndHtmlPlugin方法传入pages目录命数组,其中首页需放在名为home的文件夹下
const pagesFile = ['shoppingMall', 'personalCenter', 'home'];
const { entry, htmlWebpackPlugins } = utils.setEntryAndHtmlPlugin(pagesFile);
// webpack配置入口和插件
module.exports = {
    entry: entry,
    plugins: [].concat(htmlWebpackPlugins.map(html=>{return new HtmlWebpackPlugin(html)})),
}
# 工具封装
# package.json
npm i glob,用于同步的获取文件列表
# index.js
- 该文件即我们的多页面打包方法文件,导出一个setEntryAndHtmlPlugin方法
exports.setEntryAndHtmlPlugin = function (entryFile) {
    // 处理自定义目录
    let custom = handleCustom(entryFile);

    // 整合配置
    const entry = {};
    const htmlWebpackPlugins = [];
    custom.forEach((v)=>{
        Object.assign(entry,v.entry)
        htmlWebpackPlugins.push(v.htmlWebpackPlugins)
    })
    return {
        entry,
        htmlWebpackPlugins,
    };
};
该方法接收一个Array数组类型的参数,即需要打包的的src/pages下的自定义目录列表。
返回一个对象,entry属性的值对应webpack配置的entry入口,
htmlWebpackPlugins属性的值为html-webpack-plugin插件生成实例的配置对象。
setEntryAndHtmlPlugin方法主要调用了handleCustom方法,handleCustom方法接收自定义目录列表作为参数,同样返回一个Array数组,数组的每一项都为如下格式的对象,代表了一个需要打包的页面。
随后setEntryAndHtmlPlugin方法整合了handleCustom返回的数组,返回最终结果。
{
    entry: entry,
    htmlWebpackPlugins: html,
}
- 在讲述handleCustom前,我们先在index.js中增加声明如下常量和方法
const glob = require("glob");
const path = require("path");
const projectRoot = process.cwd();

function resloveDirs(dir, type) {
    if (type === 1) {
        // 处理自定义目录下的子目录
        return glob.sync(path.join(projectRoot, `src/pages/${dir}/*/index.js`));
    } else if (type === 2) {
        // 处理自定义目录下的index
        return glob.sync(path.join(projectRoot, `src/pages/${dir}/index.js`));
    } else {
        return [];
    }
}
glob:用于同步的获取文件列表
path:用于处理路径
projectRoot:为进程执行时的工作目录
resloveDirs:该方法接收两个参数,dir即我们自定义目录列表的某一项,type用于区分是自定义目录的首页还是子页面
- handleCustom方法
//处理自定义入口和模板
function handleCustom(entryFile) {
    let arr = [];

    let paths = entryFile;
    if (!paths.length) return arr;

    for (let i = 0, l = paths.length; i < l; i++) {
        // 处理自定义目录下的index
        let index_dir = resloveDirs(paths[i], 2);
        if(index_dir[0]){
            arr.push(setEntryHtml('index',paths[i],index_dir[0],paths[i] === 'home'? 0 : 2))
        }
        // 处理自定义目录下的子目录
        let dir = resloveDirs(paths[i], 1);
        if (!dir.length) continue;
        let reg = new RegExp(`src\/pages\/${paths[i]}\/(.*)\/index\.js`);
        for (let j = 0; j < dir.length; j++) {
            let match = dir[j].match(reg);
            arr.push(setEntryHtml(match[1],paths[i],dir[j],1))
        }
    }
    return arr;
}
handleCustom方法的入参和反参我们已经说过了,这里讲一下他的主要处理过程。
当没有任何自定义目录时,直接返回空数组。
反之对自定义目录列表进行遍历,分两部分处理:自定义目录的首页和子页面,每一部分通过resloveDirs方法返回的数组长度,我们即可判断是否有匹配的页面。
处理自定义目录的首页,直接调用setEntryHtml方法,将其返回推入结果数组。
处理自定义目录子页面,遍历子目录列表,对每一个子目录通过正则匹配出子目录名,作为setEntryHtml方法的第一个入参,调用setEntryHtml方法,将其返回推入结果数组。
- setEntryHtml方法---设置入口和模板
5.1 该方法接收4个参数
match:子目录名或"index"
dirName:为自定义目录列表的某一项
fullpath:为resloveDirs方法返回的某一项,即某个index.js文件的绝对路径
type:0 首页 1 自定义目录的子页面 2 自定义目录的首页
5.2 根据type类型生成各自的配置项
5.2.1 htmlWebpackPlugins配置项(文档) (opens new window)
template:模板文件的位置
filename:输出html文件的文件名
chunks:允许插入到模板中的一些chunk,与entry中打包生成的文件名对应
5.2.2 entry配置项
打包生成的文件名: 对应的打包文件
function setEntryHtml(match,dirName,fullpath,type) {
    let templatePath = type !== 1
                            ? `src/pages/${dirName}/${match}.html`
                            : `src/pages/${dirName}/${match}/index.html`;
    let outputPath = type === 0
                        ? `${match}`
                        : type === 2
                            ? `${dirName}/${match}`
                            : `${dirName}/${match}/index`;
    let html = {
        template: path.join(projectRoot, templatePath),
        filename: `${outputPath}.html`,
        chunks: ["vendors", outputPath],
        hash:true,
        minify: {
            html5: true,
            collapseWhitespace: true,
            preserveLineBreaks: false,
            minifyCSS: true,
            minifyJS: true,
            removeComments: true,
        },
    }
    let entry={}
    entry[outputPath]=fullpath;
    return {
        entry: entry,
        htmlWebpackPlugins: html,
    }
}